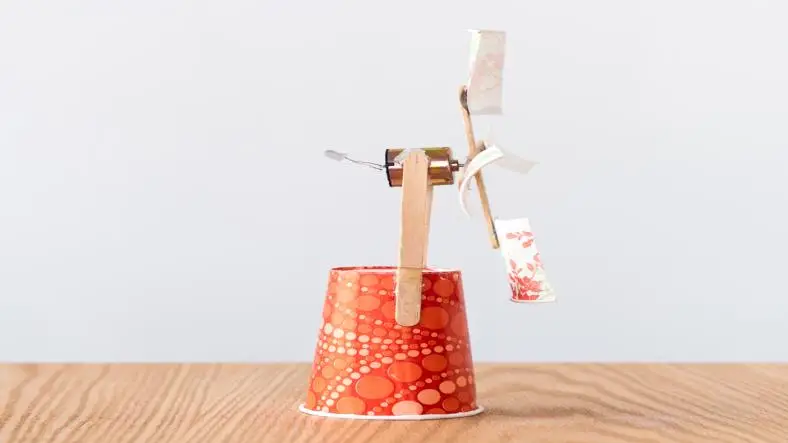
Building a mini wind turbine is a great science experiment for children that demonstrates the principles of wind energy and how it can be converted into electricity.
Here’s a step-by-step guide to creating a simple mini wind turbine using easily available materials:
Materials Needed:
- Plastic Bottle: For the turbine's body.
- Cardboard or Plastic Sheets: For the turbine blades.
- Wooden Dowels or Sticks: For the turbine’s axle.
- DC Motor: To generate electricity from the wind.
- Hot Glue Gun or Tape: For assembling parts.
- Wires: To connect the motor and to test the electricity output.
- Multimeter or Small LED: To measure the electricity generated.
- Scissors or Utility Knife: For cutting materials.
- Ruler and Pencil: For measuring and marking.
Procedure:
- Prepare the Turbine Body: Take a clean, empty plastic bottle and cut off the bottom. The remaining part of the bottle will serve as the main body of your wind turbine.
- Make the Blades:
- Cut the Blades: Use cardboard or plastic sheets to cut out four blades. The blades should be shaped like long triangles or rectangles, each about 4-6 inches long. They can be cut to different sizes to see which works best.
- Attach the Blades: Attach the blades evenly around the top edge of the bottle using hot glue or tape. Make sure they are evenly spaced and angled slightly to catch the wind.
- Create the Axle:
- Prepare the Dowels: Cut a wooden dowel or stick to be slightly longer than the diameter of the bottle. This will act as the axle of the wind turbine.
- Attach the Axle to the Turbine: Poke a hole in the center of the bottle cap. Insert one end of the dowel through the hole and secure it with glue or tape. The dowel should spin freely when the wind hits the blades.
- Attach the DC Motor: Attach the DC motor to the other end of the dowel. You might need to use glue or tape to secure the motor in place. Ensure that the motor’s shaft aligns with the axle so it can turn as the axle spins.
- Connect Wires: Connect wires to the terminals of the DC motor. These wires will be used to measure the electricity generated or to connect to a small LED.
- Set Up the Wind Turbine:
- Mount the Turbine: Place the wind turbine in an area where it can catch the wind. You can use a stand or simply position it outdoors in a breezy spot.
- Test the Turbine: Observe the blades spinning as the wind blows. The spinning motion will turn the axle and drive the DC motor, generating electricity.
- Measure the Electricity:
- Using a Multimeter: Connect the wires from the DC motor to a multimeter to measure the voltage generated by the turbine.
- Using an LED: Connect the wires to a small LED to see if it lights up. The LED should glow when the turbine generates enough electricity.
Scientific Explanation:
- Wind Energy Conversion: The wind turbine captures kinetic energy from the wind with its blades. As the wind blows, it causes the blades to spin, which in turn rotates the axle connected to the DC motor.
- Electricity Generation: The rotating motor converts the mechanical energy from the spinning axle into electrical energy. This electrical energy can then be measured or used to power small devices like an LED.
Tips for Success:
- Blade Design: Experiment with different blade shapes and sizes to find the most efficient design. Larger and more angled blades generally capture more wind energy.
- Motor Placement: Ensure that the DC motor is securely attached and aligned with the axle to maximize efficiency.
- Wind Speed: Higher wind speeds will generate more electricity. Conduct the experiment on a breezy day or in a location with consistent wind.
Safety Considerations:
- Handle Tools Carefully: Use scissors or utility knives with caution. Supervise children during the cutting and assembly processes.
- Electrical Safety: Ensure connections are secure and avoid short circuits when testing with a multimeter or LED.
Building a mini wind turbine is a fun and educational project that illustrates the principles of wind energy and electricity generation. By creating a working model, children can gain hands-on experience with renewable energy concepts and learn about the mechanics of wind turbines. This experiment not only enhances their understanding of science but also encourages creativity and problem-solving.
Thanks for reading the article, for more Science and Technology related articles read and subscribe to peoples blog articles.


