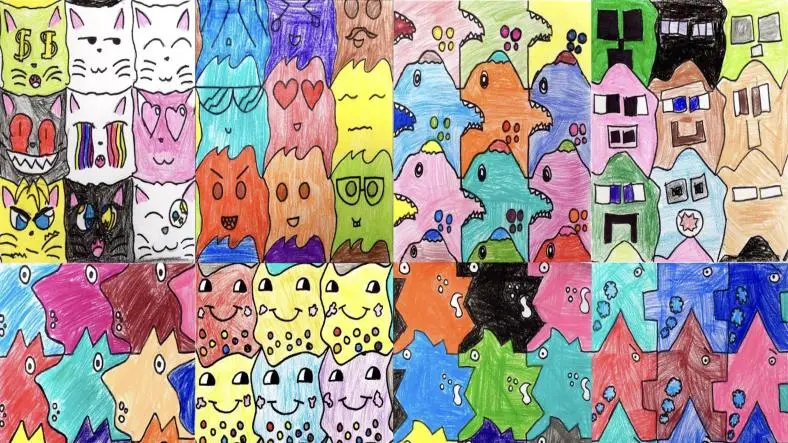
Tessellation art is a wonderful way for children to explore geometry and symmetry through creative expression. Tessellations involve creating patterns that cover a surface without any gaps or overlaps using geometric shapes. This activity helps children understand concepts such as shape, symmetry and repetition in a fun and engaging way.
Here’s a step-by-step guide to creating tessellation art:
Materials Needed:
- Paper: For drawing and creating tessellations (plain or colored paper).
- Pencils: For sketching designs.
- Markers, Crayons, or Colored Pencils: For coloring the tessellations.
- Ruler: For drawing straight lines and measuring.
- Scissors: For cutting out shapes.
- Glue: If assembling tessellations from cut-out shapes.
- Templates: Optional, for pre-made geometric shapes.
Step-by-Step Guide:
1. Understand Tessellation Basics:
- Define Tessellation:
- Tessellation is a pattern made by repeating a geometric shape without any gaps or overlaps.
- Examples include regular polygons like squares, triangles and hexagons.
- Explore Examples: Show children examples of tessellations in art and nature (e.g., honeycombs, tiled floors and mosaic patterns).
2. Create Simple Tessellation Patterns:
- Choose a Shape:
- Start with simple geometric shapes like squares or triangles.
- These shapes are easier to manipulate and understand.
- Draw the Shape:
- On a piece of paper, draw the chosen shape using a ruler and pencil
- Ensure that the shape’s edges are straight and angles are accurate.
- Create a Template:
- If desired, create a template of the shape by cutting it out.
- This will be used to trace the shape multiple times.
- Arrange the Shapes:
- Repeat the Shape:
- Place the template on a new piece of paper and trace the shape repeatedly, aligning the edges without gaps or overlaps.
- Continue this pattern across the entire paper.
- Cut and Arrange: Alternatively, cut out the shapes and glue them onto another piece of paper to create a tessellation pattern.
- Repeat the Shape:
3. Explore Advanced Tessellations:
- Experiment with Shapes:
- Polygon Tessellations:
- Try using regular polygons like hexagons or octagons.
- Draw and arrange these shapes to create a tessellation.
- Irregular Tessellations:
- Create more complex patterns by altering the shape’s sides or angles.
- Cut out different shapes and arrange them to cover the paper.
- Polygon Tessellations:
- Transform Shapes (Transformation Tessellations):
- Use transformations like rotations, reflections, or translations to create more intricate designs.
- For example, create a tessellation by reflecting and rotating a basic shape.
4. Add Color and Design:
- Color the Tessellation:
- Once the tessellation is complete, use markers, crayons, or colored pencils to add color to the shapes.
- Experiment with different color patterns to enhance the design.
- Create Patterns:
- Consider adding patterns or designs within the tessellated shapes to make the artwork more dynamic.
- For example, add stripes, dots, or gradients to each shape.
5. Display and Discuss:
- Display the Art:
- Hang or display the completed tessellation art in a prominent place.
- This could be on a wall, bulletin board, or as part of a classroom exhibit.
- Discuss Geometry Concepts:
- Discuss the geometric principles observed in the tessellation.
- Talk about symmetry, repetition and how different shapes fit together without gaps.
Scientific Concepts Explored:
- Geometry and Symmetry: Understanding how shapes can repeat and fit together without gaps.
- Pattern Recognition: Identifying and creating repeating patterns.
- Transformation: Exploring transformations like rotation and reflection in art.
Tips for Success:
- Start Simple: Begin with basic shapes and gradually move to more complex patterns as children become more comfortable with the concept.
- Encourage Creativity: Allow children to experiment with different shapes and colors to create unique tessellation patterns.
- Provide Guidance: Offer support with measurements and drawing to ensure accurate tessellations.
Safety Considerations:
- Scissors Use: Supervise younger children when using scissors to ensure safe cutting practices.
- Non-Toxic Materials: Use non-toxic art supplies to ensure safety.
Conclusion:
Creating tessellation art is a creative and educational way for children to explore geometry and symmetry. By designing and coloring their own tessellations, they gain a deeper understanding of geometric concepts while engaging in a fun and artistic activity. This hands-on experience enhances spatial reasoning and pattern recognition skills, making learning about geometry an enjoyable and memorable process.
Thanks for reading the article, for more Science and Technology related articles read and subscribe to peoples blog articles.


