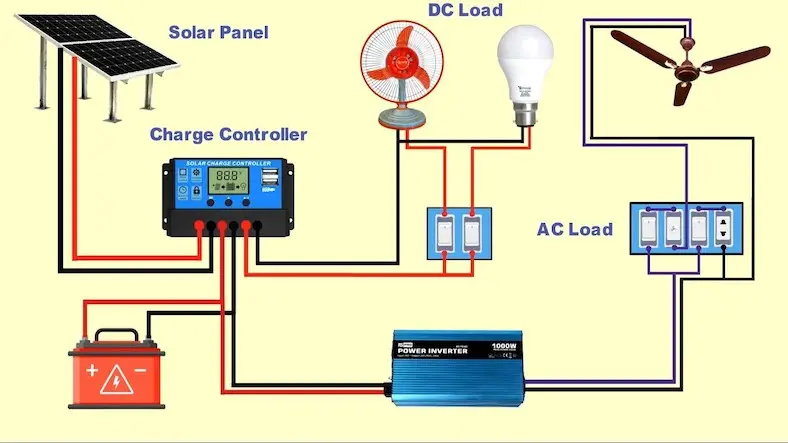
A charge controller, also known as a charge regulator, is a crucial component in a solar panel system. Its primary function is to regulate the voltage and current coming from the solar panels and going to the battery bank.
Here's how to use a charge controller in a home solar panel setup:
Purpose of a Charge Controller:
- Prevents Overcharging: Charge controllers prevent overcharging of batteries by regulating the flow of current from the solar panels to the batteries. This extends the lifespan of the batteries.
- Avoids Deep Discharging: It also prevents the batteries from being discharged too much, which can damage the batteries.
- Optimizes Charging: Charge controllers have a feature called Maximum Power Point Tracking (MPPT) or Pulse Width Modulation (PWM) that helps optimize the charging process, ensuring that the batteries receive the maximum available power from the solar panels.
Using a Charge Controller:
- Select the Right Type:
- There are two main types of charge controllers: PWM and MPPT.
- PWM (Pulse Width Modulation): Suitable for smaller systems with a lower number of panels. They are generally less expensive but less efficient than MPPT controllers.
- MPPT (Maximum Power Point Tracking): More efficient and suitable for larger systems with higher voltage panels. They can convert excess voltage into additional current.
- There are two main types of charge controllers: PWM and MPPT.
- Connecting Solar Panels:
- Connect the solar panels to the charge controller using appropriate gauge solar cables. Connect the positive and negative leads from the panels to the corresponding terminals on the controller.
- Connecting Batteries:
- Connect the positive and negative leads from the battery bank to the corresponding terminals on the charge controller. Ensure that the polarity is correct.
- Connecting Load (Optional):
- Some charge controllers have a load output which can be used to power DC loads directly. Connect the load to the corresponding terminals on the controller.
- Setting Voltage Parameters (If Applicable):
- Some charge controllers allow you to set parameters like battery type (e.g., lead-acid, lithium), voltage thresholds for charging and discharging. Refer to the controller's manual for specific instructions.
- Mounting and Installation:
- Mount the charge controller in a location where it is protected from the elements and has good ventilation. It should be close to the batteries to minimize cable length.
- Monitoring and Maintenance:
- Regularly monitor the charge controller's status and voltage readings to ensure it is operating correctly. Clean the terminals and connections periodically to prevent corrosion.
- Safety Considerations:
- Always follow safety precautions when working with electrical components. Disconnect the solar panels and battery bank before making any connections or adjustments.
- Consult the Manual:
- Always refer to the specific manual provided by the manufacturer for detailed instructions on installation, operation and maintenance.
By using a charge controller in your solar panel setup, you can ensure that your batteries are charged efficiently and protected from overcharging or deep discharging, ultimately prolonging their lifespan.
Thanks for reading the article, for more Science and Technology related articles read and subscribe to peoples blog articles.


