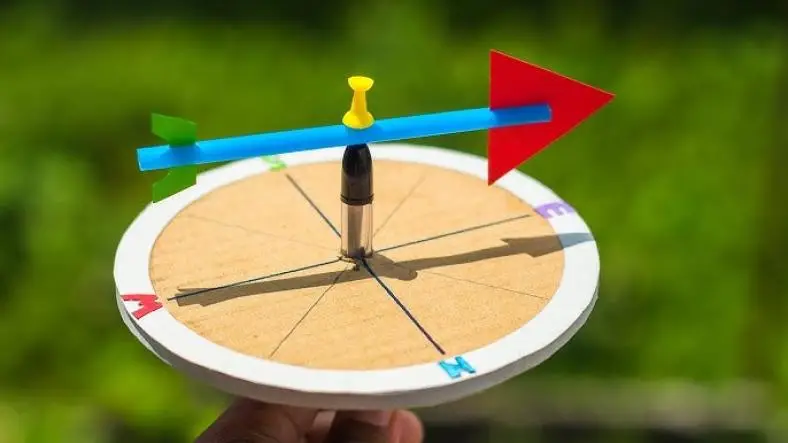
Creating a simple wind vane is a fun and educational science experiment for children that helps them understand wind direction and meteorological concepts. A wind vane, or weather vane, indicates the direction from which the wind is blowing.
Here’s a step-by-step guide to building a basic wind vane using common materials:
Materials Needed:
- Plastic Straw or Wooden Dowel: For the central axis of the wind vane.
- Cardboard or Plastic Sheet: For making the vane (the part that catches the wind).
- Drinking Straw: To act as the pointer or indicator.
- Push Pin or Tack: To attach the vane to the central axis.
- Scissors: For cutting materials.
- Glue or Tape: To secure the parts together.
- Compass: For orientation and calibration (optional but helpful).
- Pencil or Marker: For labeling and marking directions.
Procedure:
- Prepare the Central Axis:
- You can use a plastic straw, a wooden dowel, or a similar straight object as the central axis of the wind vane.
- If necessary, cut the central axis to a suitable length.
- For a simple model, a length of about 6-12 inches works well.
- Create the Vane:
- Cut a piece of cardboard or plastic sheet into two arrow-shaped pieces.
- One piece will be the front (facing into the wind) and the other will be the back (to provide balance).
- Glue or tape the two arrow-shaped pieces together, ensuring they are aligned properly.
- Attach the Vane to the Central Axis:
- Position the vane at one end of the central axis.
- Ensure that the vane is perpendicular to the axis so that it can rotate freely.
- Use a push pin or tack to attach the vane to the central axis.
- Insert the pin through the center of the vane and into the central axis, allowing it to spin freely.
- If using a straw, tape or glue the vane to the straw securely.
- Create the Pointer (Optional):
- Attach a small drinking straw or a piece of paper as a pointer on the opposite end of the central axis from the vane.
- This will help in determining the wind direction.
- Mount the Wind Vane:
- You can mount the wind vane on a pencil stuck into a piece of clay or dough to make it stand upright.
- Alternatively, attach it to a small stake or stick that can be inserted into the ground.
- Make sure the wind vane can spin freely without obstruction.
- It should be placed in an open area where it can catch the wind.
- Test and Calibrate the Wind Vane:
- Position the wind vane outdoors where it can catch the wind.
- Observe the direction the vane points to determine where the wind is coming from.
- Use a compass to find cardinal directions (North, South, East, West) and label them around the base of the wind vane for easy reference.
Scientific Explanation:
- Wind Direction:
- The wind vane rotates to align itself with the direction of the wind.
- The vane's shape and design help it catch the wind, causing it to point in the direction from which the wind is blowing.
- Principle of Operation:
- The wind pushes against the larger surface area of the vane, causing it to turn until it aligns with the wind direction.
- The pointer or a marked part of the vane then indicates the wind's origin.
Tips for Success:
- Balance the Vane: Ensure that the vane is balanced and that the central axis can spin freely. An unbalanced vane may not point accurately.
- Use Lightweight Materials: Lightweight materials for the vane allow it to spin more easily and accurately reflect changes in wind direction.
- Check for Obstructions: Ensure there are no obstructions around the wind vane that could affect its ability to turn freely.
Safety Considerations:
- Handle Tools Carefully: Use scissors and push pins with care to avoid injuries.
- Mount Securely: Ensure the wind vane is securely mounted to avoid it falling or breaking.
Building a simple wind vane is a great way for children to learn about wind direction and meteorological concepts. By creating and using their own wind vane, they can observe how wind direction changes and gain hands-on experience with weather instruments. This experiment fosters an understanding of basic weather science and encourages curiosity about natural phenomena.
Thanks for reading the article, for more Science and Technology related articles read and subscribe to peoples blog articles.


![OnePlus Pad 2(12.1 Inch)LCD Display,12GB RAM, 256GB Storage,Snapdragon 8 Gen 3,144Hz Refresh Rate,Dolby Vision & Atmos,Open Canvas,AI features,6 speakers,Wi-Fi with Cellular Data Sharing [Nimbus Gray] OnePlus Pad 2(12.1 Inch)LCD Display,12GB RAM, 256GB Storage,Snapdragon 8 Gen 3,144Hz Refresh Rate,Dolby Vision & Atmos,Open Canvas,AI features,6 speakers,Wi-Fi with Cellular Data Sharing [Nimbus Gray]](https://m.media-amazon.com/images/I/61tslaYWLjL._SX679_.jpg)

