A solar oven is one of the most exciting science experiments children can try. It teaches them how sunlight can be converted into heat energy, how renewable energy works, and how simple materials can be used to cook real food. This hands-on project is safe, affordable and highly educational, making it ideal for school activities, science fairs, and home learning.
In this detailed guide, you will learn how to build a solar oven using everyday materials, how the science behind it works and how to help children understand solar energy in a practical way. This article has step-by-step instructions and clear explanations that make the process easy to follow for kids, parents and teachers.
What Is a Solar Oven?
A solar oven is a device that uses sunlight to cook food. It captures sunlight, reflects it onto a dark surface, and traps heat inside. This heat builds up and cooks the food slowly. Solar ovens are environmentally friendly because they do not use electricity, gas or fire.
Children love this experiment because it looks like magic when sunlight cooks food inside a cardboard box. Behind this magic is science, and this experiment makes that science easy to understand.
Learning Goals of This Experiment
This DIY solar oven experiment helps children learn:
- How solar energy can be converted into heat energy
- What the greenhouse effect is
- How reflective and absorptive surfaces work
- How renewable energy can replace traditional cooking methods
- Basic engineering and problem-solving skills
- The importance of sustainable living
It also encourages creativity and curiosity, allowing children to test different cooking times, box sizes and angles to improve the oven's performance.
Materials Needed
You do not need any expensive tools. All materials are easily available at home or in school.
- A clean cardboard box (pizza box or medium shipping box)
- Aluminum foil
- Black construction paper
- Clear plastic wrap or a small glass sheet
- Tape or glue
- Scissors or a utility knife (adult supervision required)
- A small dark-colored cooking pot, tin tray or metal plate
- Food items like marshmallows, chocolate, biscuits, cookies, or small vegetables
Using a pizza box makes this project simple because the lid already acts as a flap.
Step-by-Step Procedure
Follow these instructions to build a functional solar oven.
Step 1: Prepare the Cardboard Box
- Choose a clean, sturdy cardboard box.
- If using a pizza box, open the lid.
- If using another box, cut the top to create a flap that opens upward.
- Leave about 1–2 inches around the edges of the flap so that the lid stays strong.
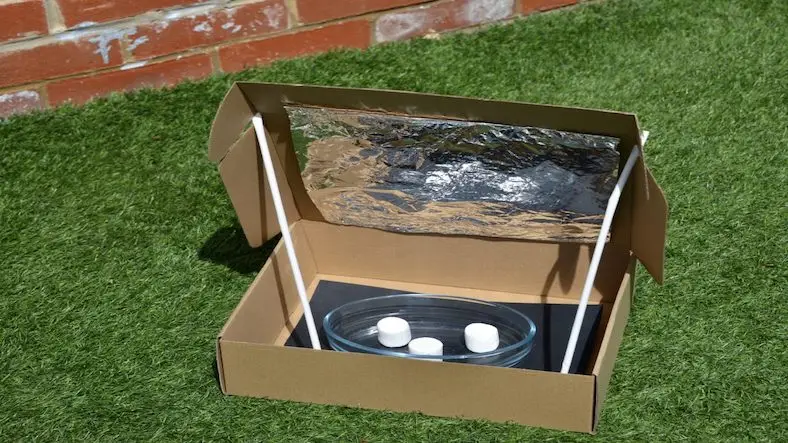
This flap will reflect sunlight into the box, helping the oven heat faster.
Step 2: Make the Reflective Surface
- Cover the inside of the flap with a sheet of aluminum foil.
- Keep the shiny side facing outward.
- Smooth the foil and tape it tightly.
- Optional: Line the inner walls of the box with foil to increase reflection.
The foil reflects sunlight into the box, increasing the temperature.
Step 3: Prepare the Heat-Absorbing Surface
- Place a sheet of black construction paper at the bottom of the box.
- Tape it so it stays flat and does not move.
Black absorbs sunlight better than any other color, helping the oven heat quickly.
Step 4: Create the Greenhouse Effect
- Cover the opening created by the flap with clear plastic wrap.
- Stretch the plastic tightly to avoid gaps.
- Seal the edges using tape.
- You can also use a thin glass sheet instead of plastic wrap.
This transparent layer lets sunlight enter but stops heat from escaping, similar to a greenhouse.
Step 5: Place the Food Inside
- Put the food into a small dark-colored pot or metal tray.
- Place the pot on the black paper inside the oven.
- Close the box and adjust the flap so that sunlight reflects directly onto the food.
Dark-colored containers absorb more heat, helping the food cook faster.
Step 6: Position the Solar Oven Under Sunlight
- Take the solar oven outdoors on a sunny day.
- Place it in direct sunlight.
- Adjust the flap angle to reflect maximum sunlight inside.
- You may need to reposition the oven every 20–30 minutes as the sun moves.
The more sunlight the oven receives, the better it works.
Google Ad 1
Cooking Time and Results
Cooking time depends on:
- Strength of sunlight
- Outside temperature
- Type of food
- Size of the box
- Efficiency of your reflective surfaces
Typical cooking times:
- S’mores: 20–40 minutes
- Cookies: 45–90 minutes
- Simple vegetables: 1–2 hours
- Nachos with cheese: 30–60 minutes
This slow cooking process teaches patience and observation skills.
Scientific Explanation for Children
This experiment is a practical demonstration of several scientific principles:
1. Solar Energy Conversion
Sunlight carries energy. When sunlight hits a surface, it turns into heat. Aluminum foil reflects sunlight into the box, sending more light to the cooking area. The black paper absorbs this light and changes it into heat energy.
2. Greenhouse Effect
The clear plastic wrap or glass sheet traps heat inside the box. Sunlight gets in easily, but heat has difficulty escaping. As more heat gets trapped, the temperature rises. This is the same principle that warms real greenhouses and contributes to Earth's climate system.
3. Heat Absorption and Reflection
Shiny surfaces reflect heat. Dark surfaces absorb heat. This is why:
- Foil is used on the flap to reflect sunlight
- Black paper is placed at the bottom to absorb heat
- Dark cooking pots work better than shiny ones
4. Insulation
The cardboard box acts as insulation. It slows down the release of heat, keeping the inside warm enough to cook food.
Tips for Best Results
- Use your solar oven between 11 AM and 2 PM when sunlight is strongest.
- Make sure the plastic wrap is tight and sealed properly.
- Try different angles for the reflective flap to improve heating.
- Use small, thin food items for quicker results.
- Add more layers of plastic wrap for better insulation.
Safety Considerations
- Always supervise children when using scissors or sharp tools.
- The inside of the solar oven can become hot. Use a cloth or glove to remove food.
- Avoid cooking raw meat, as solar ovens may not reach safely high temperatures.
Educational Benefits
This experiment helps children:
- Understand renewable energy
- Learn basic engineering design
- Observe cause-and-effect relationships
- Practice critical thinking
- Explore sustainable living
- Improve creativity
- Participate in real scientific inquiry
Teachers can also use this activity to explain climate change, energy conservation and eco-friendly cooking methods.
Conclusion
Building a DIY solar oven is a simple yet powerful science experiment for children. It uses sunlight, a free and renewable resource, to cook food while teaching important scientific and environmental concepts. Kids enjoy watching the slow cooking process, especially when making fun treats like s’mores or cookies. This hands-on project encourages curiosity, problem-solving and responsible learning about energy.
Thanks for reading this article. For more science and technology experiments, projects and educational content, read and subscribe to PeoplesBLOG.
